What can it do/how do I use it? Following are the features that particularly interest me. See the doco for the full story.
Let's start slowly and work up to the power/usefulness of this little puppy.
-
Load a digitised 1:25000 topographic map from NSW LPI TopoView Raster 2006, using the OziExplorer .map file to calibrate it
- Convert a TopoView .ecw map to .png format. Why - Bit Map doesn't handle ecw formatted maps. How - I use IrfanView freeware. Store the .png file in a working directory
- Copy the corresponding OziExplorer .map file to the working directory. Change the name of the .map file so that it has the same filename as the .png file. Use Notepad to change the working directory .map file to point to the working directory .png file
- Zip the working copy .map and .png files into a folder (whatever name is chosen for the .zip file will be used to name the map display in Bit Map eg. Corin Dam)
- Connect iPhone to PC via USB. Start iTunes. Select the iPhone in DEVICES. In the Apps tab, select Bit Map in Apps under File Sharing. Use the Add... button and browse to the working directory .zip file. Click Open and wait for the .zip file to appear in Bit Map Documents under File Sharing in the Apps panel of iTunes. Start Bit Map on the iPhone. Touch ..., then touch Acquire. (eg. it takes around 20 minutes to load and manipulate a 1:25000 topo map).
My limitation - can't load the ~5.4GB NSW mosaic from NSW LPI TopoView Raster 2006 into memory on my PC so that IrfanView can convert it to .png. So have to be content with individual map sheets.

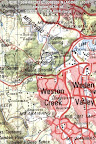
Bit Map App in iPhone 4S screen shot
Loaded map is NSW LPI TopoView 2006 Canberra 1:25000
Where was I when I took this screen shot? In the cross hairs (with translucent red circle indicating the accuracy of the location reading) at National Capital Private Hospital.
- Convert a TopoView .ecw map to .png format. Why - Bit Map doesn't handle ecw formatted maps. How - I use IrfanView freeware. Store the .png file in a working directory
- Load a scanned map or other accepted image (using .map file calibration and manual calibration)
- Tediously scan the 'imagine namadgi' relief shaded map (the one you can purchase at the Namadgi Visitors Centre for ~$5) on an A4 scanner (10 segments) at 200 dpi and assemble it using Photoshop's photomerge into a .tif file of 3796 * 5917 pixels, 64.2MB.
- Calibrate it in OziExplorer using the quick 'cheat' method of creating some waypoints on another digital map covering the same area and using these to automatically assist in the Load and Calibrate Map Image process. This produces a .map file. Zip the .map file and .tif file and follow step 3.1.4 above. Map image loads into Bit Map fine (along with genuine usage fold marks and tears!). Still haven't gained much, as used OziExplorer to do the calibration.
- Trim the borders to produce a 3000 * 5815 pixels, 49.9MB .tif file.
- The Manual Calibtarion Method described in the File Acquisition Guide requires that the file name of the map be projection datum zone left bottom right top.ext. The 'imagine namadgi' map is © 1999, so assume MGA94. The tick marks are are in UTM 1km. Estimate bottom-left hand corner of the map image to be 58.5-21.4 and top-right hand corner to be 95.6-94.6.
- So rename the trimmed file UTM GDA94 55H 658500 6021400 695600 6094600.tif
- Zip the renamed .tif file (and rename the Zip folder name to be used as the map name by Bit Map) and follow step 3.1.4 above.
- Location inaccuracies are introduced due to my manual calibration of a large scale map (my estimates of corner coordinates):

Location innacuracy due to manual calibration of a large scale map
Bit Map makes no distinction between waypoints and trackpoints. A Route is a collection of waypoints. If a Route is displayed with Lines: ON, it will appear as a track; if a Route is displayed with Lines: OFF, it will appear as waypoints.
- In the iTunes Apps tab for the iPhone device, select the Bit Map App. Click Add
and browse to a .kml or .kmz file containing the waypoints. Click Open.
- In Bit Map on the iPhone, tap ..., then tap Acquire. The file is downloaded and is shown in the Routes screen.
- ... more to come
- Save a single waypoint at the current location works as documented/expected by tapping the single pin-push.
- Save a moving waypoint using the pin-push with left and right arrow heads works as documented. Options available to Append to Current Route or Create New Route. This is how you create a planned route.
- Turn automatic waypoint recording on and off using the 3 pin-push. Shows a tick when on and recording; shows a cross when off and not recording. This is how you record your track. Take note of the documented warning:
WARNING: While automatic waypoint recording is on, the device's GPS receiver will operate continuously even when Bit Map is quit [my emphasis] or when the device is asleep, so that Bit Map can keep running and recording waypoints in the background. This will consume battery power quite rapidly. Make sure you turn off automatic waypoint recording when it is not absolutely necessary, and there is not likely to be an opportunity to recharge the battery soon.
| Push-pins on the bottom of the map view's toolbar |
Why didn't it work for me on the first trial? Even though the doco says that Settings, Automatic Waypoint Recording, Minutes Between Points: = 1, I'm sure my initial setting was 15. So on taking it for a 10 minute walk around the block, I got nothing!
- Using the Routes menu, tap on 1 or multiple Routes to permanently (ie. remains across Bit Map app restart) display the Lines and/or Points (depending on what is ON or OFF) on maps. The Route name shows its assigned colour as background. To turn off the display of a Route on maps, in the Routes menu, tap it to deselect. The Route name then shows on white background.
- From the main menu options, tap the Search magnifying glass icon. Tap WP Quick, WP Full or Route, then type a name. Tap the required data and it will be displayed on an appropriate map. This data display is transient (ie. is lost on restarting the Bit Map app).
-
From the Routes screen, tap > next to the desired route and tap Send. Send the email with the attached kml file.
Once the kml file is on your PC, it can be manipulated into various formats with the very useful freeware GPSBabel.
- Can't display more than ~2000 waypoints simultaneously. Will be addressed in v4.
- UTM maps cannot cross UTM zone number boundaries. Such maps will be imported as
latitude/longitude instead, and will therefore have reduced location accuracy, and will not
be able to be merged with other UTM maps of the same zone (see Limitations in the File Acquisition Guide).
This is the case with the digitised 1:250000 ACT and NSW SI5516 sheet - it can be displayed, but I wouldn't rely on location accuracy (it shows my home location a couple of km N of actual):
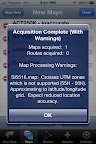
Warning message on loading 250KACT Location inaccuracy when map crosses UTM zones